I thought it would be nice if everyone who uses macros a lot shared one or two of their favourites. It might be inspiring to see how macros can improve/speed up/simplify some tasks. These can be your own macros or macros you have downloaded and find yourself using regularly.
Hopefully this will also help to encourage people who have always avoided macros because they think it's too complicated and only for programming experts. It's not - most of the time using macros is really easy. For any doubters, here's a link to my macro crash course video and a playlist of macro tutorials by Gregor, Joe and others.
Rules:
- Macro title
- Short description (keep it simple so that everyone immediately understands what the macro is good for)
- Optional image or youtube video link
- For more complex macros: Link to the macro on PreSonus Exchange or attach the .studoonemacro (or .macropage file) to the post
- No discussion posts, no questions - just 1 or 2 macros per post, to keep the thread clear and valuable. If you want to start a discussion about a macro that has been posted here (and for any "offtopic" post), just start a new thread.
Last edited:


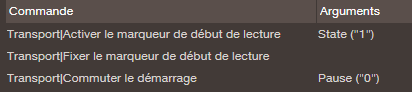
") But as I thought it would be cool, I made a macro for it. How it works :
But as I thought it would be cool, I made a macro for it. How it works :