Was just wondering what people do routing wise for taking a vst to route to a mono insert, I have some mono compressors I want to use in pipeline. Right now I’m just having to make a send to a mono buss and then routing that to my compressor but it’s annoying to have to use two channels. Is there a way to force a vst into mono. I know some vsts have both modes but most of my synths are always stereo, allot of times I just turn off effects and it’s a mono synth anyway. Was wondering if there is a better workflow then what I am doing. For my kick and bass I often set a hardware channel to mono so clearly studio one knows how to output a stereo to mono at some point, I assume it just throws away the side information when I do that.
-
Hi and welcome to the Studio One User Forum!
Please note that this is an independent, user-driven forum and is not endorsed by, affiliated with, or maintained by PreSonus. Learn more in the Welcome thread!
You are using an out of date browser. It may not display this or other websites correctly.
You should upgrade or use an alternative browser.
You should upgrade or use an alternative browser.
Instruments to mono output
- Thread starter Yluko
- Start date
Surf.Whammy
New member
I'm not certain I understand what you are trying to do, but some of it sounds like Dual Pan (PreSonus) might work.
PROBLEM
Most VSTi virtual instruments are stereo (two channels), which in Studio One maps to having a Balance control rather than a True Monaural Panning control.
A Balance control just changes the volume levels of the two channels; and it does not move the left-channel to the right or the right-channel to the left, so it's not a true monaural panning control.
This problem is caused by virtual instrument manufactures arbitrarily deciding that stereo (two channels) is what everyone should use.
There probably are some monaural sources; but since most VST effects plug-ins are stereo (two channel), even if you have a monaural source it will become stereo when you run it through a stereo VST effects plug-in.
My best guess is that it's done this way to make things easier; but in practice it's a mess that does not allow doing the types of things that Jimmy Page does with his lead guitar in "Dazed and Confused" (Led Zeppelin); and for the most part it does not allow doing the type of panning done in recording studios where nearly everything is monaural due to using monaural microphones for instruments and voices.
It took me a while to identify and then to understand this; but it makes a bit of sense and certainly explains why it's nearly impossible to do true monaural panning and mixing when you focus on using stereo (two channel) VSTi virtual instruments.
I suppose the logic that led to this was based on an "old is bad, new is good" mode of thinking, where the way things are done in recording studios is bad, but doing things in a new way on a computer is good, especially when it doesn't do what you think it does.
DUAL PAN (PRESONUS)
A few years ago, I discovered Dual Pan (PreSonus); and I think I understand how it works. If I actually understand how it works, then it's a solution.
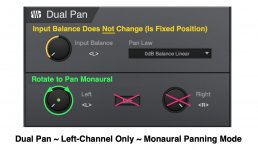
Refer to the image attached to this post.
Input Balance: Determines the focus of the Balance of the two channels; so when it's at far-left, only the left channel is included and the right channel is excluded
Pan Law: Determines the Pan Law to use, and I have it set to "0dB Balance Linear", mostly because it appears to do work nicely
Link: This is OFF
Right: This is not used
Left: This becomes the true monaural panning control, and in the image it's shown panned far-left. The key is that it works like a true monaural panning control as configured. If it's moved to top-center, then that's were the sound is heard, and when it's in the far-right position, the sound is heard at far-right, which is easiest to verify when you listen with studio-quality headphones like SONY MDR-7506 headphones.
As shown, only the left-channel is heard, not the right-channel. Then panning of the left-channel is done exclusively by the Left panning knob which in the image is labeled ("True Monaural Pan").
This is the way I understand it; and I think my understanding is correct.
It would be nice to have a sampled-sound library where the two channels are distinct and cannot be confused; but I have not found one, so far, to do a few experiments to verify my understanding.
SUMMARY
Stating it again, by moving the "Input Balance" knob to far-left, this puts focus on the left channel and the right channel is gone. Input Balance stays at far-left and does not change.
This sends a monaural signal to the "Left" knob, which makes it a true monaural panning knob, where the left-channel audio is what is panned monaurally. The right-channel is not included, so it's only the left-channel audio that is in play.
"Link" and "Right" are not used.
Observe that the Balance control on the Mixing Board for the ST4 Synth is pegged to "<C>", which ensures the left and right channels have equal volume, at least if they were recorded and digitized accurately. This is not where the true monaural panning is done; but it stays pegged to "<C>". The true monaural panning is done as described in Dual Pan, and the YouTube video shows how I used Automation to control the "Left" knob of Dual Pan to do true monaural panning for the "flying synth" effect. If you just want to place the left-channel audio in a fixed location along what I call the "Rainbow Panning Arc", then set it where you want the sound to be heard, and Automation is not required.
I made a short YouTube video and had a bit of FUN with a few of the key instruments from the start of "Billie Jean" (Michael Jackson) and an electric guitar and a "flying synth".
PROBLEM
Most VSTi virtual instruments are stereo (two channels), which in Studio One maps to having a Balance control rather than a True Monaural Panning control.
A Balance control just changes the volume levels of the two channels; and it does not move the left-channel to the right or the right-channel to the left, so it's not a true monaural panning control.
This problem is caused by virtual instrument manufactures arbitrarily deciding that stereo (two channels) is what everyone should use.
There probably are some monaural sources; but since most VST effects plug-ins are stereo (two channel), even if you have a monaural source it will become stereo when you run it through a stereo VST effects plug-in.
My best guess is that it's done this way to make things easier; but in practice it's a mess that does not allow doing the types of things that Jimmy Page does with his lead guitar in "Dazed and Confused" (Led Zeppelin); and for the most part it does not allow doing the type of panning done in recording studios where nearly everything is monaural due to using monaural microphones for instruments and voices.
It took me a while to identify and then to understand this; but it makes a bit of sense and certainly explains why it's nearly impossible to do true monaural panning and mixing when you focus on using stereo (two channel) VSTi virtual instruments.
I suppose the logic that led to this was based on an "old is bad, new is good" mode of thinking, where the way things are done in recording studios is bad, but doing things in a new way on a computer is good, especially when it doesn't do what you think it does.
DUAL PAN (PRESONUS)
A few years ago, I discovered Dual Pan (PreSonus); and I think I understand how it works. If I actually understand how it works, then it's a solution.
Refer to the image attached to this post.
Input Balance: Determines the focus of the Balance of the two channels; so when it's at far-left, only the left channel is included and the right channel is excluded
Pan Law: Determines the Pan Law to use, and I have it set to "0dB Balance Linear", mostly because it appears to do work nicely
Link: This is OFF
Right: This is not used
Left: This becomes the true monaural panning control, and in the image it's shown panned far-left. The key is that it works like a true monaural panning control as configured. If it's moved to top-center, then that's were the sound is heard, and when it's in the far-right position, the sound is heard at far-right, which is easiest to verify when you listen with studio-quality headphones like SONY MDR-7506 headphones.
As shown, only the left-channel is heard, not the right-channel. Then panning of the left-channel is done exclusively by the Left panning knob which in the image is labeled ("True Monaural Pan").
This is the way I understand it; and I think my understanding is correct.
It would be nice to have a sampled-sound library where the two channels are distinct and cannot be confused; but I have not found one, so far, to do a few experiments to verify my understanding.
SUMMARY
Stating it again, by moving the "Input Balance" knob to far-left, this puts focus on the left channel and the right channel is gone. Input Balance stays at far-left and does not change.
This sends a monaural signal to the "Left" knob, which makes it a true monaural panning knob, where the left-channel audio is what is panned monaurally. The right-channel is not included, so it's only the left-channel audio that is in play.
"Link" and "Right" are not used.
Observe that the Balance control on the Mixing Board for the ST4 Synth is pegged to "<C>", which ensures the left and right channels have equal volume, at least if they were recorded and digitized accurately. This is not where the true monaural panning is done; but it stays pegged to "<C>". The true monaural panning is done as described in Dual Pan, and the YouTube video shows how I used Automation to control the "Left" knob of Dual Pan to do true monaural panning for the "flying synth" effect. If you just want to place the left-channel audio in a fixed location along what I call the "Rainbow Panning Arc", then set it where you want the sound to be heard, and Automation is not required.
I made a short YouTube video and had a bit of FUN with a few of the key instruments from the start of "Billie Jean" (Michael Jackson) and an electric guitar and a "flying synth".
Attachments

Last edited:
Surf.Whammy
New member
As a bit of follow-up, if I understand what you are doing, then it's very important and perhaps not so subtle once it makes sense.
I think folks doing virtual music start by discovering in Studio One that you can create a series of inserts for a track (Audio, Bus, Instrument), which is easy and intuitive until you think about it a while.
For example, if you insert a reverb effect and then add an echo effect, the reverb becomes input to the echo, which is very different from the echo coming first in the sequence followed by the reverb.
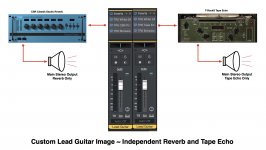
The way I solve the conundrum is to create what I call a "Custom Image", where instead of being just one track, there is a set of tracks where each track has a different separate and independent effect, with for example a separate track with reverb and another separate track with echo.
Then you can mix the amount of reverb separately from the amount of echo.
It requires more tracks, but one of the nice aspects of working with virtual instruments is being able to clone them, so that each track has the exact same content but different effects, which you also can do with already recorded audio tracks--clone and apply effects to be able to mix the effects separately and independently.
If you send the group of Custom Image tracks to a Bus Track, then you can do individual editing and mixing but then can manage and mix the group via the corresponding Bus Track.
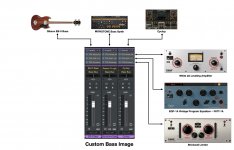
For reference, the example "Custom Bass Image" has the same effects on each track but the VSTi virtual instruments are different, where the Gibson EB-0 bass is from MODO Bass (IK Multimedia), MONOTONE Bass Synthesizer is from Reason (Reason Studios) and is on the Reason Rack VST, while Cyclop (Sugar Bytes) adds a bit of wobbly gnarl. This combination has deep bass from the MONOTONE Bass Synthesizer, smooth bass from the Gibson EB-0 bass, and a bit of wobbly gnarl to create a custom bass sound.
I do nearly everything with music notation; so I just copy the music notation to each of the virtual instrument tracks which maps to them playing the same notes and timing but the virtual instruments are different--each contributing something to the overall blend, where even with processing by the EQP-1A Vintage Program Equalizer and the "FATT-1A" preset (IK Multimedia), the Gibson EB-0 bass doesn't have as much deep bass texture and tone as I prefer; so I enhance it with the MONOTONE Bass Synthesizer and Cyclop.
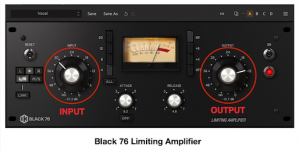
Instead of using the Volume sliders, I peg them to 0dB and use the effects to set the volume levels, which is more precise and vastly less visually cluttered, where the overall strategy is to use White 2A and the Brickwall Limiter for the primary levels, EQP-1A to add bass tone, Cyclop to add wobbly and gnarly texture, and so forth; but the primary volume levels are set by the White 2A Leveling Amplifier and the Brickwall Limiter, although sometimes I use the Black 76 Limiting Amplifier, but mostly for vocals, since it works nicely for vocals. These are from IK Multimedia, and they are precise emulations of the physical signal processors used in the 1950's and 1960's and are known for their gracious, melodic affects on audio.
Of course, you can use the Volume sliders, which can be set precisely, but everything is tiny and not so easy to see. In contrast, using the various compressor-limiters is very precise and easy to see, as well as being adjustable when mixing and listening.
I think folks doing virtual music start by discovering in Studio One that you can create a series of inserts for a track (Audio, Bus, Instrument), which is easy and intuitive until you think about it a while.
For example, if you insert a reverb effect and then add an echo effect, the reverb becomes input to the echo, which is very different from the echo coming first in the sequence followed by the reverb.
The way I solve the conundrum is to create what I call a "Custom Image", where instead of being just one track, there is a set of tracks where each track has a different separate and independent effect, with for example a separate track with reverb and another separate track with echo.
Then you can mix the amount of reverb separately from the amount of echo.
It requires more tracks, but one of the nice aspects of working with virtual instruments is being able to clone them, so that each track has the exact same content but different effects, which you also can do with already recorded audio tracks--clone and apply effects to be able to mix the effects separately and independently.
If you send the group of Custom Image tracks to a Bus Track, then you can do individual editing and mixing but then can manage and mix the group via the corresponding Bus Track.
For reference, the example "Custom Bass Image" has the same effects on each track but the VSTi virtual instruments are different, where the Gibson EB-0 bass is from MODO Bass (IK Multimedia), MONOTONE Bass Synthesizer is from Reason (Reason Studios) and is on the Reason Rack VST, while Cyclop (Sugar Bytes) adds a bit of wobbly gnarl. This combination has deep bass from the MONOTONE Bass Synthesizer, smooth bass from the Gibson EB-0 bass, and a bit of wobbly gnarl to create a custom bass sound.
I do nearly everything with music notation; so I just copy the music notation to each of the virtual instrument tracks which maps to them playing the same notes and timing but the virtual instruments are different--each contributing something to the overall blend, where even with processing by the EQP-1A Vintage Program Equalizer and the "FATT-1A" preset (IK Multimedia), the Gibson EB-0 bass doesn't have as much deep bass texture and tone as I prefer; so I enhance it with the MONOTONE Bass Synthesizer and Cyclop.
Instead of using the Volume sliders, I peg them to 0dB and use the effects to set the volume levels, which is more precise and vastly less visually cluttered, where the overall strategy is to use White 2A and the Brickwall Limiter for the primary levels, EQP-1A to add bass tone, Cyclop to add wobbly and gnarly texture, and so forth; but the primary volume levels are set by the White 2A Leveling Amplifier and the Brickwall Limiter, although sometimes I use the Black 76 Limiting Amplifier, but mostly for vocals, since it works nicely for vocals. These are from IK Multimedia, and they are precise emulations of the physical signal processors used in the 1950's and 1960's and are known for their gracious, melodic affects on audio.
Of course, you can use the Volume sliders, which can be set precisely, but everything is tiny and not so easy to see. In contrast, using the various compressor-limiters is very precise and easy to see, as well as being adjustable when mixing and listening.
Attachments
Last edited: